ShopDreamUp AI ArtDreamUp
Deviation Actions


Suggested Deviants


Suggested Collections


You Might Like…


Featured in Groups


Description
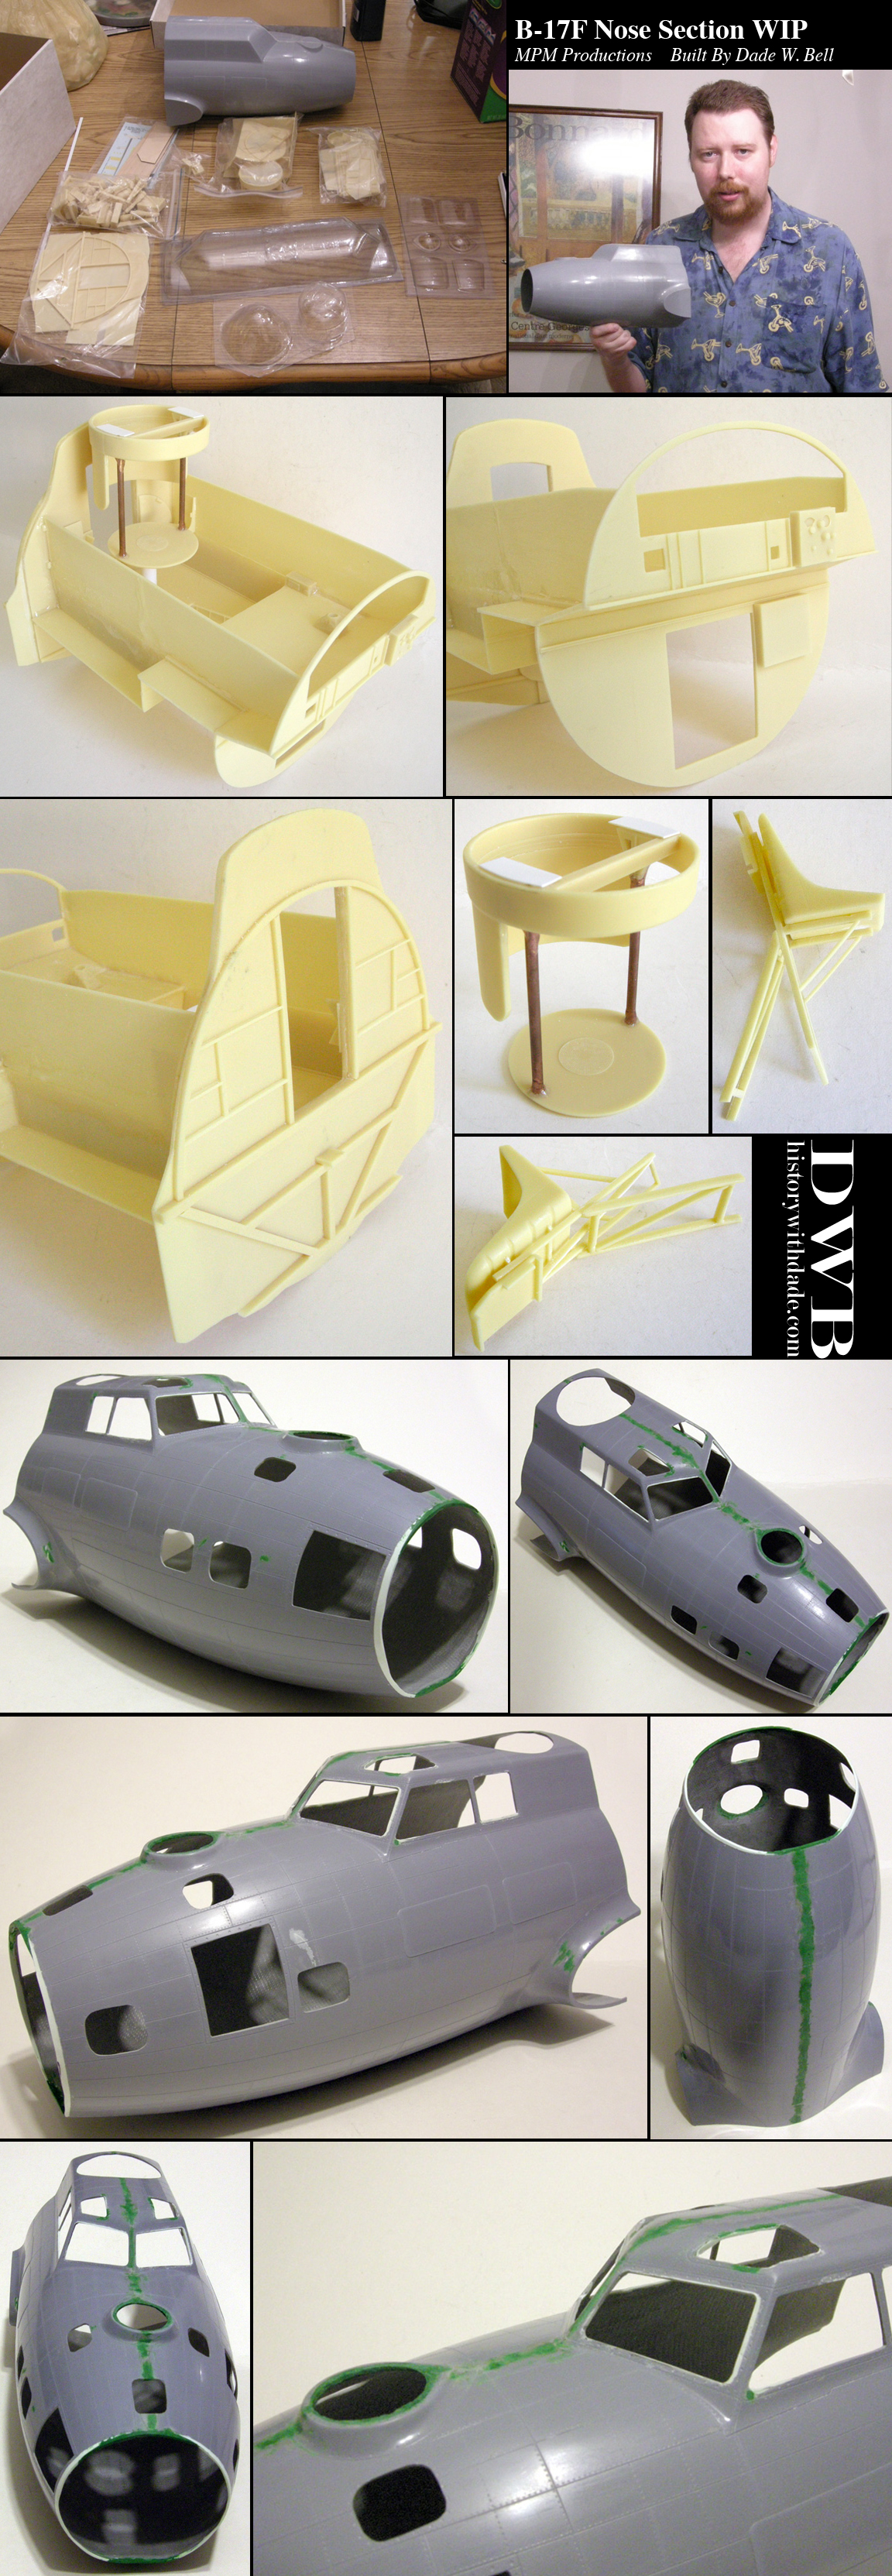
1/18 B-17F "Memphis Belle" Nose
A commission I did in 2007. What follows is the article I wrote for Aeroscale about it.
--------------------------------
I was commissioned to build this model as an industrial build. As such, this review is a straight out of box build review wherever possible.
There's an old Mad Magazine comic about a model of the USS Constitution. When the box of the model is opened, the builder is greeted with a block of wood, a knife, and instructions that say only, "Remove anything that does not look like the USS Constitution." While MPM's 1/18 scale B-17F nose isn't so bad as the model in the story, keeping that story in mind and a sense of humor helps in this daunting build. Be sure to set aside a lot of time. Due to the size of this kit, the many issues that pop up will take considerably longer to correct than if they were to appear in "normal size" models.
Materials:
A certain amount of preparation work is required before starting this project to try to keep last minute runs to the hobby shop to a minimum.
Along with the usual assortment of tools (knives, sandpaper, files, etc.), I can't stress enough the importance of a rotary tool (Dremel, etc.) in this project. Make sure that it's an AC electrical type and not cordless as you will use the tool a LOT, all while needing torque that the rechargeable type simply doesn't have. Of almost equal importance is a Flex Shaft attachment that will allow you to get into tight spots all while having better control. You'll need some cutting and sanding heads. There's going to be a lot of resin and fiberglass flying around, so make sure to be in a well-ventilated area, and keep a couple of breathing masks and your safety glasses near.
Also, be sure to have plenty of Tamiya Epoxy Sculpting Putty, regular filler putty (I use Tamiya and Squadron), CA glue, 2-part epoxy (I use 5 minute set), white glue, and paint. I know that it seems like a no-brainer to have plenty of paint, but it's mind boggling how much volume this model takes up and how much paint it goes through. I used Gunze Sangyo paint for all major assemblies. I used Interior Green (H-58), Olive Drab 1 (H-52), and Light Gray (H-324). Even after mixing for airbrush at a rate of 60% thinner (alcohol) to 40% paint, I still went through six bottles of Interior Green, five bottles of Olive Green 1, and three bottles of Light Gray. Your results may vary. I also made sure to keep around an extra bottle of each for touch up. Oh, and make sure that your stocks of Tamiya tape are full.
Instructions:
The instructions in this kit are incredibly misleading. They're illustrated very well. The only problem is that those nice illustrations don't always match what's happening in the kit. Time and again, I'm convinced that nobody at MPM actually used these instructions to build a production model- the completed model shown in MPM's photos are of a prototype that includes many items not found in the kit (cockpit door, interior wiring, etc.). The instructions will frequently show parts being placed behind other parts so that you have no idea what the final location is. Proportion and distances between items look "right" in the instructions until you try it on the model and discover that there's no way a part can fit as shown because there isn't enough room. Some instructions are wrong: when building the seat belt straps in section 2, switch parts 54 and 60. Later in the instructions, switch PAP B12 with PAP B9 and vice versa.
Construction:
Exterior:
Okay, so now that we've spent a fortune in buying extra tools and materials, let's get to work!
First thing's first- this model does not come with a base in any way, shape or form, so you'll have to plan what you want to do in that regard. I measured the curvature of the fuselage bottom in two spots, drew up a base plan and mailed it to my father, an expert wood worker.
Due to the size of this model, MPM chose to make the nose fuselage exterior out of fiberglass. It is made up of two halves bonded together at the factory. I'm not sure why MPM chose to bond the halves together instead of letting the builder do it. The bond is so messy that it obscures surface detail along the center. Putting tape on either side of the joint helps protect the surrounding fiberglass during clean up. I used the rotary tool to help expedite the process by filing the bulk of the joint down with a small sanding drum. There are bubbles in the bond, so you'll have to putty the area of the join to make it smooth. Remember to re-scribe the lines and details that the bond covered up.
While the outside of the nose is smooth, the inner surface has the telltale fiberglass gauze pattern. It will have to be sanded smooth and polished unless you want the inside of your B-17 to look like a leg cast! You don't have to polish the entire interior- just the spaces that will be seen. Here, the rotary tool is also a time-saver. I purchased a sanding flap wheel in 1.25 x 1 inch 80 Grit to get the bulk of the work done (the flex shaft allows you to get inside easier) before moving on to regular sand paper to smooth things out. I left a little bit of texture here and there to add visual interest.
Now comes the most time consuming and frustrating part of the entire build: cutting out the twenty-plus openings for the windows, inner wing areas, and turret. All of the glass for the cockpit area comes in lightly tinted plastic vac-u-formed around a nose buck. The instructions depict the option of either cutting out the windows from the fiberglass and plastic piece, or chopping off the entire top section and replacing it with that plastic piece. I chose to cut the windows out individually, as the latter option didn't seem structurally sound, and the thickness of the cockpit walls would have no longer matched up to the rest of the nose walls- final construction would likely turn into a nightmare of varying thicknesses, flexing, and who knows what else.
Here is where the rotary tool is a must. Attach a cutting head and start cutting out the windows. Make sure to leave about 1/8" to 1/16" extra so that you don't cut off too much. This doesn't seem like it would take so long, but make sure to set aside a few hours for this task- the time flies. After cutting out the main openings, file or sand down to the edges. Unfortunately, our old friends, the bubbles, are back. This is particularly nasty as the fiberglass begins to splinter and shatter, mostly in the cockpit area. I can only assume this is because the cockpit area is higher up and is harder to pack the fiberglass into...? The same issue occurs in the skylight. Even the lightest sanding or filing can cause a major disaster that can take hours to correct. It's time to break out the Tamiya Epoxy Sculpting Putty and rebuild the edges of the window openings in these trouble spots.
The nose opening is also a little messy and has to be cleaned up. The transparent plastic for the nose is another vac-u-form affair and a dry fit is the order of the day. After cutting the nose out and comparing it to the opening, I can see that the opening doesn't match. Time for more epoxy putty! After a lot of shaping, cutting, and sanding, everything finally fits. Also, the interior wing spars (resin) don't fit either as the fiberglass is too thick in the interior area. A lot of fiberglass has to be removed for the spars to fit and even then, get ready to use a lot of putty! Even though the spars fit in front, the backs hang out beyond the nose (and eventually the rear tub plate), so they'll have to be cut down to fit.
A quick note about the fiberglass exterior: if you have to putty any thing on the surface, just sanding it won't do. The fiberglass will show the most miniscule scratches, so be ready to polish everything smooth after any sanding.
Windows:Next, I cut out the windows for the cockpit and slowly but surely work them into the correct shape. This seems like it would be easy, but remember, they were vac-u-formed OVER a fuselage buck. So they're actually a little bit larger than the openings they need to go into. They're always off just enough to drive you crazy. The instructions show a sheet of plastic that I imagine is for cutting out the smaller fuselage windows from. That piece isn't included with this sample, so I had to cannibalize glass from the spare gun windows that MPM luckily provided (too bad there's no spare fuselage!). The large windows that hold the .50 caliber guns are a little easier because they can be cut out with their frame work and mounted from the outside. I set aside the windows for final assembly.
Paint:I sprayed on Tamiya primer inside and out. I then sprayed (hosed down) the interior with Gunze Interior Green (H-58). After the interior was dry, I masked the window openings from inside, stuffed either end with newspaper and pre-shaded the panel lines. This was followed by Gunze Light Gray (H-324) on to the bottom area of the exterior and then Gunze Olive Drab 1 (H-52). After the paint dried, I sprayed on a coat of Future.
Decals:The decals are for the most famous B-17, the Memphis Belle. The colors are sharp and in register, but are super thin and will come apart easily so be very careful! Also, bubbles kept popping up en masse, but after using Gunze Mr. Mark Setter, things seemed to finally calm down. After sealing the decals in with another coat of Future, I sprayed Gunze Flat Clear (H-20).
Interior:There are many warped resin parts, particularly in the supports for the seats and the walls of the cockpit tub. Be ready for lots of soaking in hot water and straightening. I dry fit the back of the tub to the exterior piece and saw that it didn't really match up at all. More sanding and filing to get everything to fit.
The cockpit tub is a very heavy assembly and just using CA glue won't cut it. I used CA just to tack the parts together before using epoxy to make the final join. I swathed on the epoxy in the areas that wouldn't be seen in final construction for added strength. The assembly doesn't fit together in a precise manner so you'll have to do plenty of test fitting and tack welding before committing to the final epoxy bond. While there are a couple of locator slots, they don't always match, so don't blindly place your trust in them.
The sides of the floor of the tub will also have to be cut to allow the tub to slide in past the wing spars. In order to fit the tub inside, you'll have to rotate the tub sideways 90 degrees, slide it in as far as you can, and the rotate it upright to slide it into final position. I can't think of any other way to describe this as the kit isn't engineered to make this a precise science. Dry fit, cut, and dry fit again! There is also a 1/4" space between the sides of the tub and the inside surface of the fuselage- more on this later. Spray the tub with Interior Green.
Many of the smaller parts are cast on needlessly large blocks, so this was another area where the rotary tool helps out. Hand sawing all of this stuff would take an eternity, and even with the rotary tool, it took almost twelve hours to clean everything up.
You have a choice for the dashboard between a resin piece and a photo etch piece. I chose the resin piece as in this large scale, the flatness of the PE part doesn't look right to me. However, the dials printed on the paper part that goes behind the face don't match up with the holes in either option. The paper will have to be cut apart so the dials match the faces. Out of all the wacky engineering in this kit, it's this part that strikes me as the most ridiculous. Would it have been so hard for MPM to test fit these two basic items? To simply put the piece on a scanner and then move the dials accordingly in Photoshop before printing? Remember to keep your sense of humor!
Seats:The supports for the pilot and copilot seats are very slight and don't go together as solidly as they should. This is another time for plenty of test fitting and tack bonding until everything lines up. If anything is off just a little, it will all come apart. The stools that go in the nose area are less finicky and go together easier, although this copy was missing one of the stool bottom cushions, so I had to scratch build one. All seats have nice seat belts made from paper with PE clasps. The belts are only printed on one side of the paper, though, so be sure to color the other side and edges where you cut the belts out or you'll have white paper showing.
Turret:The turret area will require a lot extra attention. First, there is nothing for the turret to actually sit on, so you'll have to build some kind of stand for it rest on. Next, the turret frame is supposed to be supported by two resin rods. These aren't strong enough for the task, so replace them with metal tubing. The instructions show the turret ring attaching to the frame via two clasps that just doesn't work in reality. I used epoxy to attach the rods to the base and ring, mounted the clasps to the rods, and then covered the opening with some sheet styrene cut to shape. To better fair in the support structure, I used some paper to make sleeves for the rods. Putty was later used to create the weld bead between the frame and turret ring.
Final Construction:After all of the subassemblies are done and painted and after applying the water slide decals, there are still a number of paper decals to put on. These are not self adhesive, so you'll need white glue to attach them (CA glue will just soak into the paper and not do anything). All of the windows are now glued in from the inside except for the two large front windows that the .50 calibers are held in, the skylight, and the nose cone. They mount from the outside and will be one of the last steps of assembly.
Now to tackle the space between the tub and interior wall. Due to the complex curvature of the wall having to blend with the straight sides of tub, building something out styrene or anything else would be too hard. Instead, I glued strips of paper to the outside of the tub that goes about 1/2" above the tub side walls. I painted the paper interior green and after sliding the tub in for the last time and gluing it in place, the paper curves nicely to the fuselage wall. I then reach my tweezers through the turret hole, pull the paper away from the wall, and use a long stick to put some glue in the space. The paper is let go and it glues up snug to the fuselage. Tah-dah!
There are still some fit issue with the back wall and the fuselage, so get ready to create some kind of way to clamp all of this together while the epoxy sets. I put tape along the outside edge of the fuselage to protect the paint from the epoxy, epoxy putty, and filler putty. After a day or so of drying, I cleaned up the area and masked it off to re-spray some of the missing Interior Green.
Wood pieces are provided for the floor and table and thankfully they fit without any fuss. I used Weld-Bond to glue them in place as it works well with porous surfaces and stays somewhat flexible to allow the wood to shrink and expand in various states of humidity. After mounting all of the other doo-dads in the nose area and then skylight, it's time to glue the nose on. The nose has been dipped in Future to make it stronger and also to keep it from crazing from glue. A piece this big needs something stronger than white glue, so I use CA and the Future keeps it nice and clear. Any small gaps are filled in with Micro Kristal Klear.
Last but not least, are the gun windows. The .50 caliber guns included in this kit aren't really that great. In 1/18 scale, I would expect at least a hollow barrel (not just the tip) and a separate sleeve. The only thing these guns have going for them are PE cross hairs. Still, I've seen more detailed pieces in 1/35 scale... While the kit includes the guns, it does not include any way to actually mount the guns (the instructions are unhelpful here as well). I created mounts by going to Michael's and buying some wood beads for making necklaces. The holes in the beads needed to be widened a little for the barrel to fit through. I cut the beads in half so that they would be round facing outward, but flat against the guns. After gluing guns to beads and beads to windows, the windows were glued into place.
After over 250 hours of work, the completed model sits on the base and it's ready to go to the client. Aside from the original builder model, this copy is the only known assembled piece in the world.
Conclusion:
I'm a firm believer in the concept of "You Get What You Pay For". At a list price of $399.95 and street prices of around $350, that axiom doesn't hold up with this kit. For such a pretty penny, you get inaccurate instructions, lousy fit, illogical engineering, sub-par fiberglass, ridiculously thin decals and missing pieces. And as if to taunt you further, the box photos show a super detailed build that includes stuff that doesn't even come in the kit for such a steep price. Things that should have been simple such as the windows were needlessly complex, and if just a little more thought would have been put into the engineering side of things, the build time could have been cut in half. This is a kit that looks really nice in its in box state, but becomes an absolute dog when actually building it. If you decide to embark on this project, don't be surprised if you find parallels between yourself and Captain Ahab!
Image size
1152x3327px 2.44 MB
© 2012 - 2024 Bang-Doll-SSI
Comments7
Join the community to add your comment. Already a deviant? Log In
OMG! Yow, what a beast of a project. And for the price?! Ouch and a half!!! I feel your pain. But what a job you've done seeing it through. A huge congratulations, and I'll be sure to send you lots of advil to kill the pain of this project. My Roger Young project wasn't near this bad, but I was beginning to wonder if I'd ever get it done. Thankfully I have. Whew!!